


Good Morning Creatives!
Keri Sallee here!
Today I am sharing a very personal project that I hope will help you if you are going through a similar situation.
The “Why?”
When it’s time to be creative, there are numerous reasons we create. Sometimes it’s for fun. Sometimes it’s for practice. Sometimes it’s just purely therapeutic. That’s what this project was for me.
See this cutie?

This is my 10 year old daughter. We call her the vampire unicorn because the sun is not her friend and she has the rare combo of blue eyes and red hair. She is smart and caring and is a natural soccer star.
She also suffers from anxiety. Moments of tears and stress. Mornings of paralyzing fear where it takes us 45 minutes to get her to even walk into the school building. Nights of thinking too much about the next day that she can’t stop herself from crying. When these moments hit, she becomes non-verbal and will only communicate through writing.
Counseling has helped, but we as parents are still in this storm that we don’t really understand and often are at a loss for how to help her.
So…I create. I create for myself. I create for her.
Faith Over Fear: ATC Board
To help her focus on the good, I decided to make her a board of Artistic Trading Cards (ATCs) that she could focus on when she is feeling overwhelmed. The ATCs are attached with velcro dots so that we can change them and keep her always focusing on the positive.

Creating Backgrounds
This project was created in 2 parts: the cardboard background and then the ATCs.
For the background, I started out by cutting a piece of cardboard, using my ATCs as a template for the final size.

Originally, my board was going to hold nine cards, but I decided to cut back to six. Using these pre-cut Artistic Trading Cards from “Simply” (found at Walmart) saved me tons of time!
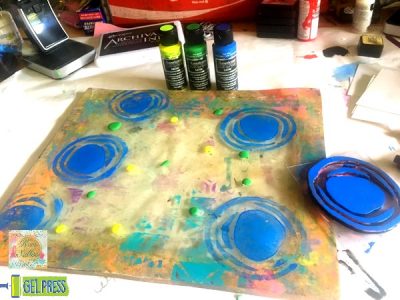
I decided to use my large, 12×14 plate from Gel Press and my Deco Art Americana Multi-Surface Acrylic Paint. Using a foam stamp, I used my blue paint to stamp my circle image on my plate.

After allowing that paint to dry slightly, I added my yellow and green paints and brayered it across my plate. To add even more texture, I stamped into my wet paint with the same foam stamp.

While the paint is still wet, I pressed my cardboard piece on to my plate. Use a firm pressure to press it down and get a good image transfer.

Here is a close-up of my background. You can see how layering the circle stamp image in-between the layers of green and yellow paint adds TONS of texture to the piece.
Making the ATCs
To make my ATC backgrounds quickly, I kept out my 12×14 Gel Press® Plate so that I could print all my backgrounds at the same time.

To give my ATCs a POP against my background, I chose to use red, lime green and turquoise paints.

I added my paint directly to my plate and used a light hand with my brayer to move it across my plate. You can see that I allowed each of the paints to have their own section, only mixed where the brayer rolled over the colors. This will allow each of my ATCs to have an individual, but similar color scheme.

Before I added my blank ATC cards, I used a heart background stamp to add impressions in my paint. The I added my ATCs and lightly pressed them into the paint.

You can see each ATC came out a little different! They have the continued theme of the hearts and similiar colors, but are unique to themselves. You will also note that I didn’t clean off my Gel Press® plate between the two parts of this project. This added some leftover bits from my background on to my ATCs.
Finishing Touches

To finish up my ATCs, I used stickers, stamps and washi tape to individualize each card. Adding a thin, scribbled line around the outside of each card and the board adds definition and brings the two projects together.

To that the ATCs can be changed out, I used these pre-made velcro dots from Hobby Lobby to attach them. I added a light pencil line to the background so that the cards would line up.

A little tip, attach the rough and fuzzy side of the velcro together before attaching to the back of the ATC card. Then line up your card with your pencil lines before pressing the sticky side down. This is much easier than trying to line up the two pieces later.
Ready for my close-up
Ready for some close-ups?


Final Thoughts
I know it is not easy for most of us to be vulnerable. I hope today will help you to be open and honest because now you know that you are not alone.
The first time my daughter went through this a couple years ago, we kept it hidden out of fear of being judged.
This time, we decided we needed an army. An army of positive thoughts and prayers. An army of people who have come beside us and said “I have been there and we survived and so can you.” An army to tell us that we are not alone.
So…I say this to you. You are not alone.
Stay focused on the positive. Practice creative therapy. Choose to be honest with those you fell comfortable with.
I’ve been there. I survived. You will, too.
Until Next time,
XOXO,

Keri