
Key Highlights
-
Get into the holiday season by making a DIY advent calendar for your family.
-
A homemade advent calendar can cost less than the ones you find in the store.
-
You can use things you already have at home or buy some cheap craft supplies to make it. This is a fun way to have your own countdowns to Christmas.
-
You can also use monoprinting techniques with Gel Press plates. This will help your advent calendar get a new and special artistic look.
-
When you fill your calendar, you can add more than only a sweet treat. Try to put in fun activities or some small gifts too.
-
Making an advent calendar like this can create a new tradition for your family. It helps all of you feel the christmas spirit in your home in the days leading up to Christmas.
Introduction
The holiday season is a good time to have fun countdowns. One nice way to feel ready for Christmas Day is to use an advent calendar. You can see so many advent calendars for sale, but making one yourself can feel really special. A DIY advent calendar will let you add your own style to the home, and you can use it for many years. In this guide, you will get each step you need to design, build, and fill an advent calendar. That way, you get a calendar that truly brings out the joy of christmas and the countdown feel for christmas day in the holiday season.
Understanding the Magic of Advent Calendars
An advent calendar is more than just something to help you count down the days. It is an important part of a holiday tradition that brings you and your family excitement each day. When you open each door, you get a small surprise. This makes you feel happy and lets the christmas spirit fill every day of December. With the advent calendar, you feel the joy of christmas more as you get ready for the holiday season.
This easy daily routine helps the family feel close to each other. It helps make good memories that all of you will remember after the holiday is over. The special thing happens when you or your loved ones get a small gift or do something with each other. The important part is the time you spend with the people you care about.
The History and Tradition Behind Advent Calendars
The advent calendar started in Germany in the 19th century. The word "advent" comes from Latin, and it means "coming." People use it to get ready for christmas. At first, German Lutherans used chalk marks on their walls or lit candles. This helped them count the days until christmas morning. NPR says they did this so they could keep track of the days in advent and wait for christmas.
This holiday tradition began simple and then changed over time. People often say the first printed advent calendar came from Gerhard Lang. He was a man in Germany who lived in the early 1900s. He made an advent calendar by putting colorful pictures onto a piece of cardboard. Gerhard Lang came up with this idea from one of his memories. When he was a boy, his mom used to sew 24 cookies on top of a box. This helped him count the days until advent.
The advent calendar started in simple ways. Over time, it changed a lot. Now, you get small doors to open. There can be pictures inside. Sometimes you find little sayings. You might see chocolates, or get small gifts in the advent calendar. The advent calendar is now loved by people from many different places and walks of life. It helps all of us count the days in the busy holiday season. This makes advent feel special and fun for everyone.
Why DIY Advent Calendars Are on the Rise
Have you seen that more people now want to make their own advent calendar? There is a good reason for that. When you make your own advent calendar, you get to choose every part of it. You can pick the design and the colors so they feel right in your home. You can make a theme that you and your family like best. In this way, your advent calendar can feel special and match your family. It also becomes something you will not find anywhere else in the christmas season. Making an advent calendar is not just about having fun. It lets us show what christmas means to each one of us in our own way.
Another big benefit is cost. The calendars that you get in the store can be very expensive. Some of them cost up to $70 or more. If you use cheap craft supplies, you can make a nice and high-quality calendar at home. It will be a lot less money than buying one from the store. It is much fun to see your project come together, and you do not have to spend too much.
Making something by hand, starting with your own idea and adding touches like homemade Christmas ornaments or special notes, brings a feel that you cannot buy in a store. Around this time of year, everything can feel busy. This is when you get a chance to slow down and bring the family closer together. Making homemade Christmas ornaments at this time of year helps to start new family ways of doing things. This makes Christmas feel even more special for all of us.
Creative Approaches to DIY Advent Calendar Design
When you make your own advent calendar, you have many ways to be creative. The style you pick can show what you like best. It can feel new or have an old feel that is warm. The look and feel of it can be a big part of your family's christmas story. Each year, an own advent calendar brings more fun to advent and christmas at home.
Take some time to think about how you want your beautiful advent calendar to look. You can have it hang on a wall, sit on the mantel, or feel like a small village. There are many ways to use and design an advent calendar. Let’s look at some top ideas that will help you get started with your special advent.
Modern & Minimalist vs. Traditional Styles
What is your holiday style? If you like things neat and enjoy simple looks, a modern DIY advent calendar may be right for you. You can use ideas that follow a minimalist style. Try using neutral colors, simple shapes, and text that is clear and easy to read. You may place clay tags with numbers onto a branch. Another idea is to put small, plain boxes in a line or in a grid. This way, your advent calendar and overall advent feel can look good and stay easy.
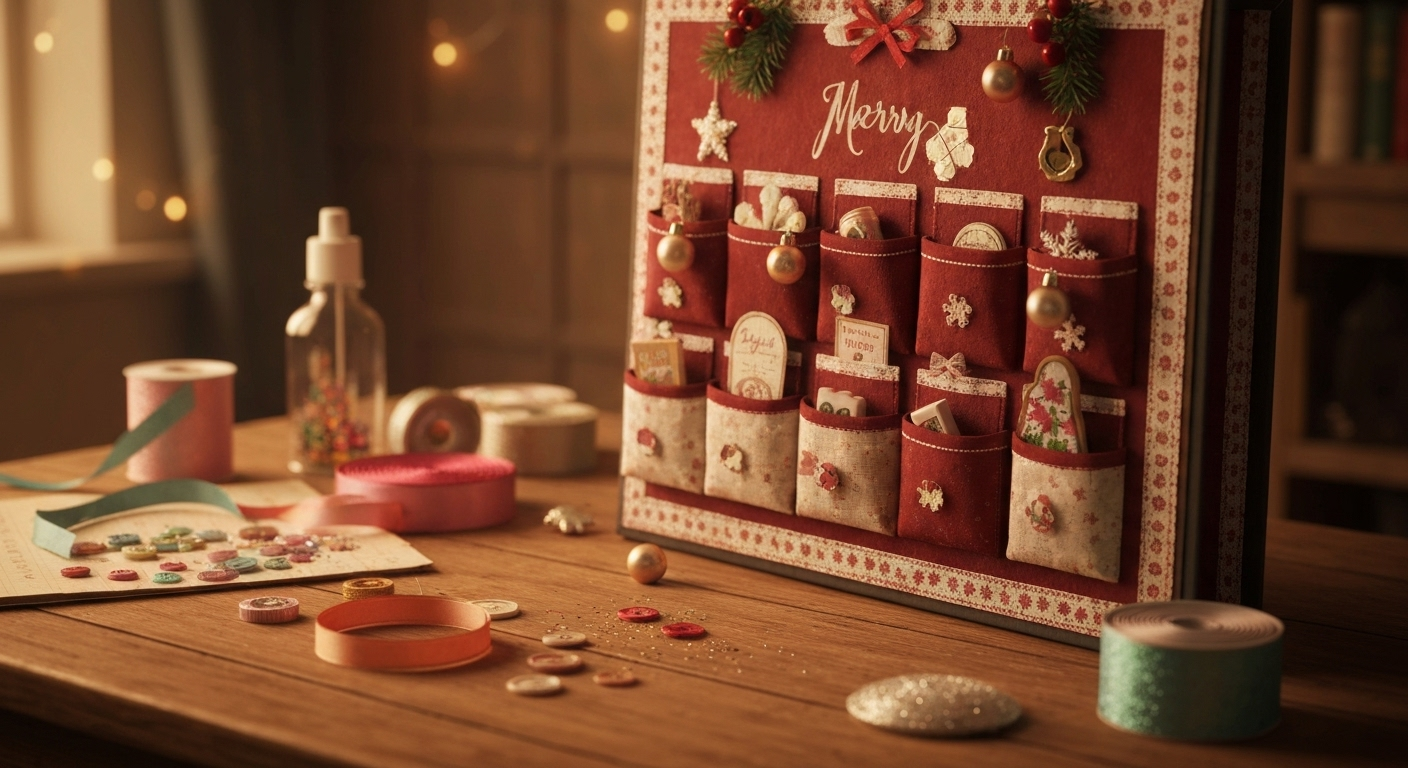
Classic styles can help people feel warm inside. They often bring back old memories of christmas. Many designs use the color red and green. These colors feel like christmas and help get people in the mood. The shape of a christmas tree is common in these designs. You may see felt Santas sitting around, or a structure that looks like the shape of a christmas tree. Some folks build a wooden calendar with little drawers. A lot of people like to use a fabric wall hanging. It has pockets so there is a surprise each day.
If you want a beautiful advent calendar, try one with plain wooden houses set up as a small village. This style looks new and modern, but also feels right for advent or christmas. You can use each house to hide something special. A house can hold christmas ornaments, or you can put in notes with the title of a new book. That way, you get time to read together and enjoy advent even more.
Unique Themes for All Ages
Why use the same theme over and over, when you can make an advent calendar with something new and fun? If you make the advent for someone who loves a hobby or something they enjoy, it will be special for them. You can build your own little holiday village, as a good idea. Make a small scene for each day, and this will give everyone more to get excited about with the advent.
Don’t just think about the Christmas season! A countdown calendar is fun to use for the whole year. You can do one for a birthday, Valentine’s Day, or any other special event that means a lot to you. If you want one for Christmas, pick a theme that your family loves. This way, you will make it feel good, special, and just right for your family.
Here are a few ideas to get you started:
-
Magical Forest: You can use boxes that look like mushrooms or felt animals. They help create a special woodland feel. This makes the place feel magical for everyone.
-
Art Studio: Every day, put out something new for art. It could be a crayon, a small paint pot, or just a sticker. This can inspire people to have fun and make art. It helps everyone feel creative all the time.
-
Baking Bonanza: Go for a baking theme. Each day, give out something like a packet of sprinkles, a cookie cutter, or a simple recipe. A gift wrapping party can be even better with these ideas. It is a good way to make christmas feel more festive and fun.
-
Nutcracker Ballet: Make a calendar with ballerinas and nutcracker figures. Every day, put a new figure on the "stage." This helps you, your family, and others feel the christmas spirit each day as you get closer to christmas.
Choosing the Right Materials for Your Advent Calendar
After you decide what you want to make, you have to get your materials. The good thing about a DIY project is that you can change it to fit your budget. You may see that you already have some supplies at home. This can help you start your holiday tradition.
From recycled cardboard and old craft paper that you have at home, you can make a nice calendar. For the last pieces, you will get to use things that help you show your style. You do not need to spend a lot of money for just one sweet treat.
Budget-Friendly Supplies You Already Have at Home
Making your own advent calendar at home can be easy and not cost a lot. Before you buy anything new, look at what you have in your house. You may find some good things you can use to make your own advent calendar. You do not need to spend much money unless you want to. Try to use what is there first. This helps you save money and makes this advent feel special to you.
Many everyday things you have at home can be used again for this project. You can get toilet paper rolls and paint them. Then, fill them with treats. Small jewelry boxes that you have kept will work well too. You do not need to throw away old things. Even wrapping paper from last year can be used to decorate your calendar. This is a good way to use what you have and make something fun.
Here are some common household items you can use:
-
Envelopes
-
Small bags made of paper or muslin
-
Cardboard boxes or tubes
-
Scrapbook paper or leftover gift wrap
-
Twine, ribbon, or yarn to hang
With a bit of creativity, you can make these simple things feel magical. You might turn them into a string of numbered envelopes or make some nice paper snowflakes. These ideas are easy to do and look good, too.
Using Gel Press Plates for Artistic Touches
To make your DIY advent calendar stand out, you can try adding some simple art with monoprinting. Gel Press plates are easy, so you do not need a lot of practice. You can make your own creative paper and use it for the calendar. This is good for people new to art, too. The steps are easy and fun, and your advent calendar will look special.
Imagine adding a special look to each drawer or envelope. A hand-printed feel can make christmas feel extra nice. You can use acrylic paint in the colors you like for the holiday. Try making prints on cardstock. You can also use mixed media paper too.
Want to make some fun patterns? You can use stencils for that. Try ones with christmas trees, snowflakes, or stars. There are many ways to play with texture and color are. As you do this, you will see every christmas piece start to look nice.
Using Gel Press plates, you can make a set of papers that go well together. They are not all the same though. This lets your project feel like it was made with care by you. With this tool, your calendar can be more than a simple craft. It will stand out as art that you feel proud to show every year.
Step-by-Step Guide to Assembling Your Advent Calendar
Now that you have all your design and materials for the advent calendar, you can start making it. This is where you get to put everything together and have some fun. Building your own advent calendar is a good way to spend family time. When you split the steps into small parts, it is easy and people feel happy doing it with their family. The process of making an advent calendar is something that everyone can take part in and enjoy together.
From planning how it will look, to adding the small things that feel nice, each step helps bring your idea for these holiday countdowns to life. Now, let us start to make a holiday tradition that you, your family, or anyone with you will like.
Preparation, Planning, and Layout Tips
Getting ready is key for a DIY project to go right. Before you start with glue, it is good to think through how each piece will go. Put out all the pieces so you can see them. You should have 24 or 25 pieces. These can be boxes, bags, or envelopes. Laying them out helps you pick the style you want. You can line them up in a grid. Or you can make a shape, like a tree. You can even make them into a group that looks random.
Measure two times before you cut one time! This tip is right for this job. You need to measure each box well before you put paper on it. Cardboard and paper-mache may be uneven in some spots. To help the paper fit better, add one-eighth of an inch to each measurement. This helps you cut and fit the paper the right way.
Get the whole family to help when you plan for the holiday season. This can be a fun time for all of you. Let the kids pick where the numbers go. They can also choose what colors they want for your project. When you do this together, building something with christmas ornaments and treats feels more special. This is a good way for everyone to feel christmas cheer. You all will make memories you can look back on and feel good about.
Decorating and Personalizing Each Day
Decorating your advent calendar is the time when you get to have fun. You can show your style for each day on the advent countdown. Try using hand-printed paper, stickers, or some paint when you work on your advent calendar. Make every part feel special for you, as this is the best thing about this advent season.
After you've made the base, it's time to put on the numbers. A lot of people use stamps, stencils, or stickers when they want the numbers to look even and neat. If you want the advent calendar to feel more like it’s from you, you can use your hand to write the numbers. You can also give each day a bit more style. Use papers for the days that are not all the same in size or feel. This will make your calendar look deeper and catch the eyes of people, making it more interesting.
Here are some ways you can make the calendar feel more like it is yours:
-
Add Embellishments: Use glue to put on small jingle bells, bows, or tiny christmas ornaments.
-
Use Photos: Print out small family photos. Place them on some of the days.
-
Incorporate Quotes: Write or stamp a few holiday quotes or jokes on the back of each tag or door.
-
Vary the Numbers: Use different fonts or styles to write the numbers. This will make it feel fun and bring out all the christmas vibes.
This is a good project for the whole family. Let everyone join in and help decorate. You can fill some days with fun surprises too.
Fun Filler Ideas: Beyond Candy
Filling an advent calendar can feel good and be fun for you. A sweet treat for each day is nice. But you can also put so many other things inside. You can use small toys, fun accessories, or other small surprises that are not candy. With all these ideas, the countdown to advent will feel special for everyone.
Adding small surprises is a great way to make the experience feel new and fun. You can add things to do together or small things to give and share. These moments help your family feel close. They also help everyone make good memories. Here are some fun ways to fill it with more than just a chocolate piece.
Creative Non-Candy Treats for Kids and Adults
Are you looking to find non-candy surprises for the advent calendar? There are a lot of small things you can use to make both kids and grown-ups happy. If you choose fun, useful, or creative items, it will feel like a real surprise every time someone opens the advent calendar.
Kids feel happy when they get small toys. You can find things like tiny animal figures, bouncy balls, or a cool eraser that has a fun shape. It is nice to give out art items too, like a new crayon, a little pot of glitter, or a sheet of holiday stickers. With these small toys and supplies, kids can be creative every day this month.
For adults, you can make your own advent calendar feel special with small gifts. A tea bag, a nice pen, or a small hand cream can be great. These things can help you feel good every day. The idea is to use advent as a way to make your day better. Here are a few more ideas for your own advent calendar.
-
Holiday-themed socks
-
Temporary tattoos
-
Fun band-aids
-
Hair accessories like clips or bows
-
Miniature ornaments to add to the tree
You can say "Merry Christmas" in many different ways. It is not only about giving candy. There are many good and fun ideas to wish people a merry Christmas. With all these ways, you can help them feel happy.
Activity and Experience-Based Surprises
An activity-based advent calendar is a good idea if you want your family to make good memories and be together. With this kind of advent calendar, you do not give a gift each day. Instead, you open it and find a fun holiday thing to do as a group. The best thing about this advent calendar is not what you get inside, but all the things you do with your family and the special time you spend with them.
Planning an activity-based calendar is simple. You can write each of your 24 fun holiday activities on different small slips of paper. Then, put one slip into each day's pocket or box. You can mix big trips with easy things to do at home. This way works well for your time and your wallet.
Here are some activity ideas to include:
-
Watch a Christmas movie with popcorn: Let the kids pick the Christmas movie that they want to see. Bring some popcorn to eat while you all watch it.
-
Do an act of kindness: Go help a neighbor by clearing snow from their driveway, or give food to a local pantry. Make sure the kids take part in this act of kindness, too.
-
Read a new book by the fire: Wrap up a new book that has a Christmas story. Open it as a family and read it together by the fire.
-
Have a holiday dance party: Make a list with songs people like from Christmas. Turn on the music and dance together.
This type of calendar makes the holiday season feel joyful. It brings people together. It also makes every moment feel special for all of us.
Integrating Monoprinting with Gel Press for Advent Calendars
Want to make your advent calendar stand out from the rest? You can do this when you use monoprinting with Gel Press plates. This is a good way to add a fun and new feel to your calendar. This technique lets you make beautiful and unique papers. These will help your advent calendar feel like a real work of art and be loved by all.
Don’t worry if you have not used this before. Monoprinting on a Gel Press is simple. You can do it. The Gel Press gives good results each time that you use it. This is a good way for people to make their project stand out. You get colors, patterns, and feel that you cannot get by buying from the store. This is a fun way to make your own art. You will enjoy using the Gel Press.
Simple Monoprint Techniques for Calendar Doors & Envelopes
Decorating your calendar doors and envelopes with a Gel Press is a lot of fun. You can start by putting a little bit of acrylic paint on the plate. After that, lay a piece of paper on top. Rub it softly so the paint can move onto the paper. Each time you do this, you will get a new print that is different from the last one.
You can use colors in layers to make your designs more fun and lively. Try stencils or use texture tools, too. If you want to work with an advent calendar, you can put number stencils right on the Gel Press plate. When you press the paper down and lift it up, the numbers will come out showing good and creative results for your advent project.
Here are some simple techniques to try:
-
Layering Colors: Put down one color on the project. After you bring up your print, add the next color over the first one. This is a good way to give your print more than one look or feel.
-
Stenciling: Place a stencil like a snowflake or a star shape onto the painted plate. After that, press your paper right on top.
-
Mark-Making: Take a paintbrush end or use a cotton swab. Draw some lines, shapes, or marks when the paint is still wet. Pull up the print after you have done this.
-
Brayer Patterns: A brayer is a roller you can use. Make the paint show cool patterns and feel with that.
Trying these monoprinting methods will let you have calendar doors that feel like small pieces of art. This way, you get to make each door look good, and people can see how special your work is. The style helps everyone feel happy when they look at it.
Recommended Gel Press Products and Class Packs
Choosing the right Gel Press helps make your advent calendar look good. If you want to make papers for the small boxes or envelopes for advent, pick a plate size that can do many jobs. A plate you can use for more than one project is the best one to have.
The Gel Press 8”x10” plate is made for people who love making art. You will have a lot of space with it. It lets you do more prints on one paper at the same time, so you get more art done fast. This is useful if you need things ready quick, for what you want, or for something like a 24-day project.
If you are making art with a group or in class, you can pick the Gel Press Class Packs. These packs have more plates in them. You and others will each get one, so you can all make art with it. This makes it easier for people to enjoy, and it helps the group feel more creative.
These products are great for adding small creative details to your work. You can use them many times and clean them easily. They are strong and do not break fast, so they last a long time. If you want to do art or crafts later on, these products will be there for you. They are a good pick for people who like to make things and will help you get through plenty of projects.
|
Product Recommendation |
Best For |
Why It's a Great Choice |
|---|---|---|
|
Gel Press 8"x10" Plate |
Individual Crafters & Small Projects |
Versatile size is perfect for creating custom papers for boxes, tags, and cards. Easy to store and handle. |
|
Gel Press 6"x6" Plate |
Quick Patterns & Small Details |
Ideal for making smaller, individual prints for tags or number squares. Great for isolating specific designs. |
|
Gel Press Class Packs |
Educators, Workshops, & Groups |
Includes multiple plates, making it a cost-effective option for group crafting sessions. |
Tips & Safety for DIY Calendar Crafting
When you are crafting with family, it is important to put safety first. You should pick safe materials and use methods that are good for family. This helps all of you be sure that your time making things is easy, happy, and safe for everyone. Kids will also feel part of it when they help out too.
Using safe paints and some easy clean-up steps can really help. They keep your crafting time safe for you and others. You get to enjoy what you make, and feel good all through, from the start until you finish. It makes things neat and fun for everyone.
Non-Toxic Paints and Safe Materials
When you make the kind of project your family will use each day, it’s very important to pick safe materials. Use non-toxic, water-based acrylic paints when you want to color or print anything. These paints are safe for people of all ages. You can wash them off with soap and water. That means these paints work well when everyone in the family is part of the project. It’s good to choose paints with the AP (Approved Product) seal from the Art and Creative Materials Institute (ACMI). This seal shows the paint is non-toxic and safe.
For the calendar’s structure, you can use things like paper mache, cardboard, or untreated wood. These are good because they are strong. They also do not have harmful chemicals. If you need glue, think about what type to use. A simple school glue is great for paper. Use hot glue if you work with heavier stuff. But let an adult help you with hot glue. You can wear silicone finger protectors too. This way, you will not burn your fingers.
Using non-toxic paints and safe materials helps you feel relaxed and lets you enjoy making things more. The Craft Industry Alliance says that creative hobbies are good for your mind and that they can make you feel better. When you pick safe tools and paints, you feel good. It makes the whole process happy and calm.
Clean-Up, Storage, and Family-Friendly Practices
A fun crafting time should be easy to clean up after. To keep things simple for you and the family, start by laying down newspaper or a craft mat on the table. Have some paper towels ready and close at hand. Keep a small basin filled with water nearby. These steps help you clean up spills right away. They are good for washing your brushes and Gel Press plates, too.
Keeping your advent calendar safe helps you use it each holiday season. When advent is finished, you should wrap the calendar in bubble wrap. You can also use tissue paper for this. Then, put it in a strong box. Store your box in a cool and dry place. This will keep out moisture and stop any damage. When the next year comes, your advent calendar will be in great shape and ready for you to use again.
To keep the crafting fun and organized:
-
Set Clear Roles: Get the kids to help with different jobs that match their age. They can use stamps or put stickers on things.
-
Work in Batches: Take one step at a time. For example, you can paint every box first. After that, move on and start to decorate them.
-
Clean As You Go: Wipe tools like Gel Press plates as soon as you use them. This keeps them in the best shape so you can use them again later.
-
Celebrate the Process: Enjoy working with your family. Have fun at every step, so the christmas spirit and joy stick around during the christmas project.
Conclusion
Making your own DIY advent calendar is a great way to count down to Christmas, and it is fun for the whole family. You get to be creative with what you put in it. With monoprinting and Gel Press plates, you can add your own style and give each day a new look. You can choose any theme you like and put in gifts other than candy. That way, everyone gets to feel special. It is not just about how your advent calendar looks. Working together to make it brings you and your loved ones closer. Gather what you need and let your ideas flow. Put together an advent calendar that gives happiness and excitement during the holiday season. If you want more tips or need some help, you can get in touch with us for a free consultation with our experts about your advent calendar!
Frequently Asked Questions
How do I keep my homemade advent calendar organized and reusable?
To make sure your advent calendar lasts each year, use wood or strong paper mache. At the end of the christmas season, wrap the advent calendar gently. Put it in a box and add a label. This way, you can find it easily for next christmas. It keeps the advent calendar safe when you are not using it. You and your family will get to enjoy this holiday tradition every christmas.
What are quick DIY ideas for busy families or classrooms?
For families that have a lot going on, you can make easy countdowns. You could make a paper chain and use each link to show what the activity is for the day. There is also a fast DIY project you can try. Clip tags with numbers on a string with clothespins. On the back of each tag, put a sticker, a joke, or a part of a christmas story. These countdowns make christmas feel special for everyone.
Where can I find printable templates or downloads for advent calendars?
You can find many free or paid templates for an advent calendar on sites like Pinterest, Etsy, and lots of creative blogs. These downloads have box templates, numbered tags, and other fun things. When you use these, it’s easy to make your own advent calendar. That way, you can wish everyone a merry christmas during advent and christmas.
What are some creative DIY advent calendar ideas for Christmas?
Creative ideas for an advent calendar can help family time feel nice. You might use a "kindness" advent calendar and do one good deed each day with those in your family. A photo calendar is also fun for advent. Put a new family photo for each day. Look at the pictures with your family. A craft calendar is good too. Use it for things you can make like homemade Christmas ornaments during Christmas. All these ideas let the family be together. So you make new Christmas traditions with your own advent calendar.
How can I make an inexpensive DIY advent calendar at home?
Make your own advent calendar at home and save money. You can use things like envelopes, cardboard rolls, or paper left from last year. If you want more things for your advent calendar, you can visit dollar stores. They have small boxes and wood shapes for a low price. This will help you keep the cost of your advent low.
What materials do I need to create a handmade advent calendar?
To make an advent calendar by hand, you need to start with some main parts. You can use small boxes or bags for this. Add some colorful paper, numbers, and glue to keep it all together. If you want your advent calendar to have your own style, you can use a Gel Press plate with paints that be safe. This is a good way to come up with fun and new paper designs for the advent calendar. You can also use string, clothespins, and a few more decorations to make it look nice.
How do I fill a DIY advent calendar with fun surprises for kids?
Fill your advent calendar with a mix of things that make kids smile. You can put in a sweet treat or add something that is not candy. Try small toys, cool stickers, or art supplies. There are other options too, like temporary tattoos or a coupon for movie night with the family. When you use this variety in your advent calendar, kids will feel excited and happy to check what’s there each day. It makes the advent feel special for them.
Can you suggest non-candy items for advent calendar fillers?
Yes, you can put things that are not candy in your advent calendar. You might like to add small christmas ornaments, erasers, hair items, lego minifigures, puzzle pieces, or a slip of paper with a fun thing your family can do. The goal of an advent calendar is to give a nice surprise each day during advent and christmas that is not just about sweets.
Are there simple advent calendar ideas for busy families?
Busy families can make the advent calendar easy. You just write one prompt every day on the chalkboard or whiteboard. That way, you will keep it simple and fun for all. There is also a good idea, you can use a jar with 24 small notes about things you can do. Every day, you pull out a note from the jar. This makes the advent feel fun. Also, there will be a new surprise each day. These ways make your advent calendar simple and full of new things for everyone.
How do I plan an activity-based advent calendar for the holidays?
To make an activity-based advent calendar, start by thinking of 24 fun things that you and your family or friends can do. You can bake cookies. You can watch a holiday movie. You can do an act of kindness. Write each idea on a piece of paper. Put each paper in its own container and give it a number. When you open one each day, you feel the christmas spirit. You enjoy the advent with family and friends. This is a good way to feel happy during the holidays and bring more christmas joy to the home.
Do you have tips for organizing or assembling a homemade advent calendar?
To make your own advent calendar at home, start by getting all the supplies you need for it. Work on it step by step. You can put the advent boxes together and decorate them all at once before putting things inside. When you need to store the calendar, put it in a strong box. A sturdy box keeps it safe. This helps you save your advent calendar so you can use it again for another year or more.
Where can I find printable templates for DIY advent calendars?
You can find printable templates for a DIY advent calendar on crafting websites, Pinterest, and Etsy. Just search for “advent calendar downloads” and you will see many free or low-cost choices. These can have boxes, tags, or numbers you can use for your own project. This is a good way to make your advent feel special for the christmas season and help it look nice at christmas.
What are some modern DIY advent calendar designs?
Modern DIY advent calendar designs use simple looks. There are neutral colors and clear text with basic shapes. You can hang canvas bags with numbers from a copper pipe. You can also put some small plain boxes in a grid. Both tips help you make a beautiful advent calendar that feels new and tidy. These ideas work well if you want your advent calendar to feel fresh and neat.
How do I make my own advent calendar?
To make your own advent calendar, start with a clear plan. Think about how you want it to look and get everything you will need. Put the base of the advent calendar together first. After that, add the numbers and put on some holiday decorations. Once that is done, fill each part with treats, small christmas ornaments, or fun things you can do. This way, every day will feel special when you use your own advent calendar for advent and christmas.
What to fill an advent calendar with?
Fill your advent calendar with different fun things to make every day feel special. You can add a sweet treat, some small toys, stickers, art supplies, festive socks, or easy activity coupons. The best part about an advent calendar is that it gives you a bit of joy each day as you wait for christmas morning. This makes advent and christmas feel more fun for all.
What is a reverse advent calendar?
A reverse advent calendar is all about kindness. Instead of taking something out each day, you put one item in. It could be food for a pantry or a new toy for a group that helps others. This advent calendar helps you think about giving and not just getting. It brings out the christmas spirit as you count down to Christmas. Doing this makes each day feel special. It’s a simple way to see how good it feels to help others during the advent season. It’s a nice act of kindness for christmas.
How to make a DIY advent calendar all from cardboard?
To make an advent calendar at home, get 24 small boxes. You can also cut some boxes out of cardboard if you do not have any. Glue all of the boxes together. You can pick your favorite shape, like a tree or a house. Then, decorate it with paint or colored paper. This will give your advent calendar a fun, new look. Making your own advent calendar is a good way to save some money and still have a special advent countdown.